Kitchen Design – to open or not to open… that is the question
You always hear that the kitchen is the heart of a home. Well this home’s heart is not a healthy one and is in need of a heart transplant. So it is time to plan for this surgery, to increase the health of the house and give it another lifetime to live.
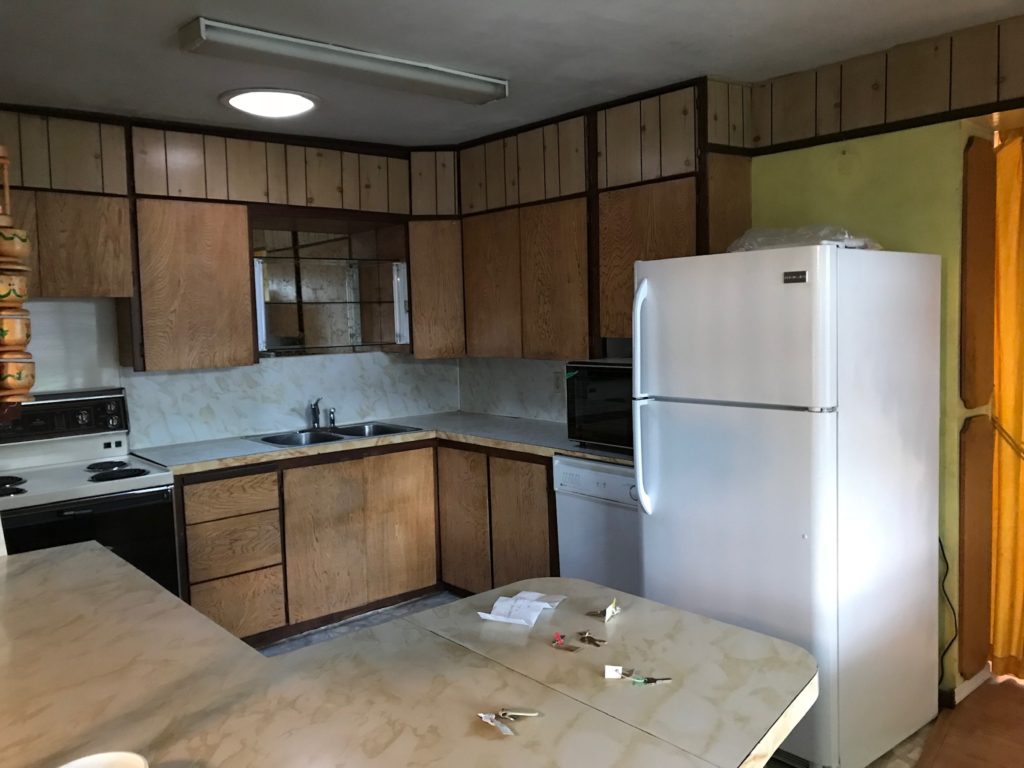
We start by looking at the existing layout of the kitchen. The kitchen is currently 11’X11’ with a hallway that goes through it connecting the entry to the dining room. When looking straight on at the kitchen from the kitchen passage you will find a stove and sink against the back wall. The fridge and dishwasher are to the right against the wall that divides the kitchen and dining room, and a microwave sits on the counter. Cabinets are…. well I am not sure. I think they are hand made with plywood type planks. The counter wraps around to provide a small sit up bar along the passage way, with an opening to the house entry. It is workable but definitely needs to be gutted to provide a blank slate to plan the best layout.


So with hammers, crow bars and safety gear in hand we start with the demo. I have to say, the kitchen is built like a tank and takes considerable effort and strength to remove. Sadly it also continues down the path of massive dust clouds and yes… more mouse droppings, and I would be remiss in not mentioning the continued theme of spider webs… EVERYWHERE! But once demo’d we are left with a much more open space between the entry and kitchen. With the removal of the overhang above the sit up counter it has definitely opened the space and let in more light. The existing lino came up easily as well, as I do not believe it was even glued down. I have to say the space looks completely ill… I am not sure which state looked worse, the before or after. But at least we can see what we are dealing with, and can start planning.
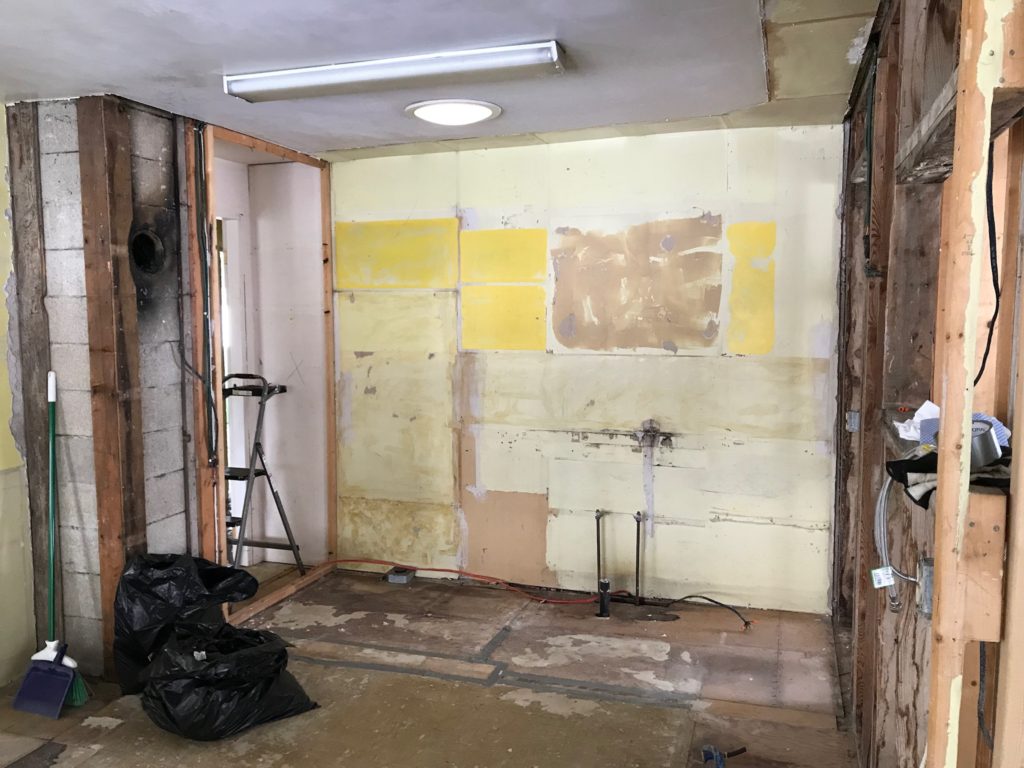
So lets take stock. There is currently a hall closet that backs onto the kitchen. By removing this closet and opening it into the kitchen we can make the kitchen larger and provide more cabinets and counter space. Done! This is an easy item to tackle and provides value to the kitchen. Good news story. We also look at the wall between the kitchen and dining. My gut wants to take the wall down and open up the kitchen to the dining room and living room, and install a big eat up island. But is that a load bearing wall? What would it take and cost to remove and support properly? So we have removed the drywall from that wall to better understand what we are dealing with.
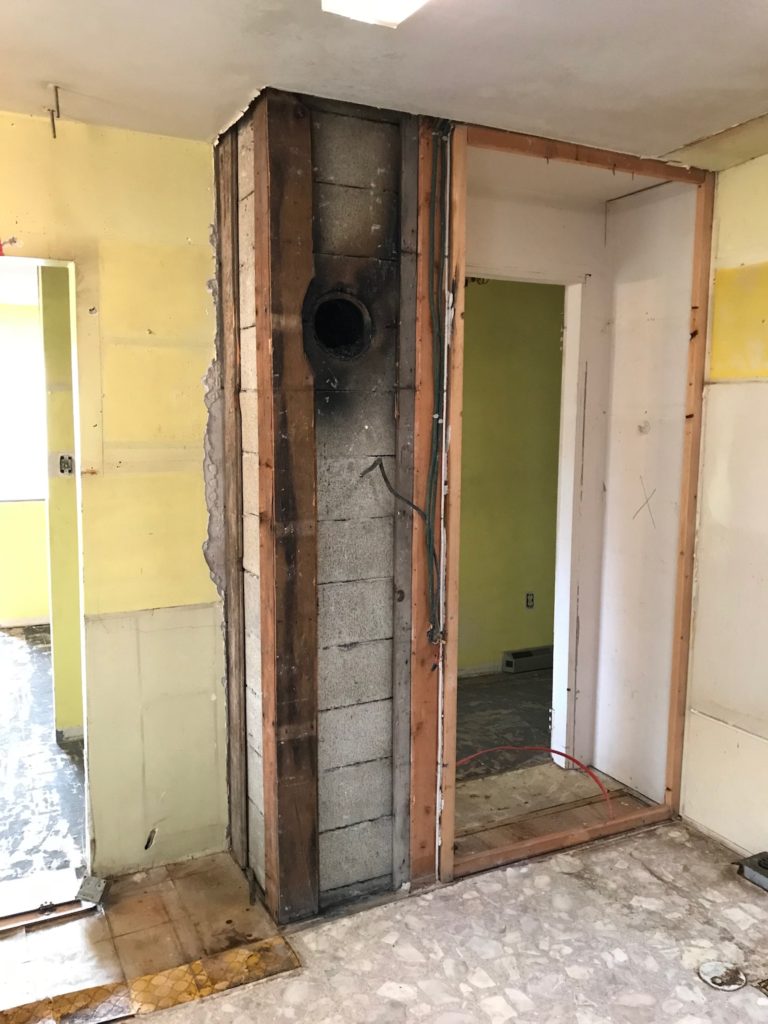
And here is where the story goes awry, and we return to the horror part of our journey. The closet removal went well, however we discovered a cinderblock chimney located in the middle of the wall of the kitchen. Sadly this prevents us from fully opening up the kitchen on that side, without significant work to remove the chimney. But this is not the horror of this story. It appears this chimney once vented a wood stove. It is also where the previous owner was venting his wood burning heater downstairs. Well lets just say the last time the chimney had been cleaned was…. NEVER! There is approximately 2 inches of creosote on all sides of the chimney. The chimney opening in the kitchen was also not capped off, other than the drywall that was on the wall. So the chimney was venting between the chimney and drywall into… the walls? Ceiling? Attic? Amazing no one was harmed by any gases. In addition to this, this was the same chimney that was used for venting the oil furnace. All I can say is total code violation and that the chimney has been condemned by the inspector. Also the only way to remove the build-up in the chimney is to remove the liner within. Uggghhh! More contractors and cost.

However this horror story does not end here. We then turn to the wall between the kitchen and dining room where the drywall has been removed. Here we find… well lets just say an interesting blend of mishaps. First the header above the entry to the dining room turns out to be only supported by one small corner of a 2X4 on one side. So basically no support. Amazing it hasn’t caved in. First thing we did was put a temporary support in place. Next we look at the wall between the rooms. We notice some wiring nightmares. There are a couple of receptacles with bare wires and ripped sheathing, but the biggest horror is the spider web of wiring behind the wall. Many bare wires, crisscrossing wires and unprotected connections. A fire waiting to happen! Thankfully we discovered this and immediately turn off the power. So in fact amazing the house has not burned down. Another addition to the reno… full rewiring of the kitchen.

Wiring Nightmare 
Wiring Nightmare 
Poorly Supported Header
We are a little stunned by what we have discovered… It is almost as if the house is looking at me in shame and apologetically for its state. It does not need to apologize, as I am just happy we are here to save it. My husband on the other hand I think may be ready to walk away. So we take a moment and think, ok now what do we do with this mess? Some of my original design ideas are now out the window, but new ones start floating in. I have always read that kitchens and bathrooms sell a place and are where you want to invest your money to add value. But you also need to consider your budget and do not want to overspend beyond the value of your house, pricing you out of the market. So looking at the house, what is the best kitchen layout for the flow of the house, cost and lifestyle? Well there are definitely many things to consider when planning a kitchen.
I really wanted to remove the wall between the kitchen and dining room, but our original decision for ease and costs, is to leave the wall alone and design within the existing enveloped. As previously mentioned in my post House CPR – Bringing it Back to Life. we are going to install an IKEA kitchen. So to the IKEA site I go. I originally plan to do a kitchen with grey cabinets, but after some research on the quality of the grey versus the white IKEA cabinets, we opt for the white shaker style cabinets. This will also provide a brighter kitchen space, given the size of space we are dealing with. We will then inject some grey accents through the backsplash and walls.
IKEA has an amazing design approach. They have a software program you can access on their website and design your kitchen from your home computer. It allows you to play with many configurations and view 3D models of the design. Allowing you to visualize what the kitchen will look like in your space. All you need is the dimensions of your space, plug them into their software and let the creativity flow. You can include doors, windows and openings in the design to truly match the layout of your space. You have full access to all of their cabinets and appliances to drop into your design. Select lower cabinets, upper cabinets, full height cabinets, all of different sizes and configurations to best layout your kitchen. Do you want doors or drawers; full depth cabinets or shallow cabinets; corner, wall or island cabinets? Pick your door fronts (style and colour), handles, handle configuration, soft closing doors, shelves, countertops, etc. You can even plug in lighting and furniture to show the full layout.
So in our first layout we choose the white shaker style cabinets to fill the 11’X11’ size of the room, with wood butcher block countertops. Including a sit up bar close to the entry side of the house. We also move the appliances around for a better flow of the kitchen. With the fridge now against the wall between the entry and kitchen. The sink and dishwasher are located at the back of the kitchen, so we can work with the existing plumbing configuration. The stove and microwave hood fan are moved to the wall between the kitchen and dining room. This requires us to only redo some wiring, which needs to be done anyways given the state of the wiring we have found in this space. The new space looks great and is functional although a little tight. Now keep in mind that it took me about 5 drafts before landing on this layout, with each draft showing different cabinet configurations and appliance layouts. The other design feature we have incorporated is camouflaging the chimney. As it would be too much work and cost to remove, we have to work around it. So we will enclose it with matching cabinet material to make it blend into the design. It will look like a full length cabinet, just without the functionality.

Upon further reflection, and a nudge from the house, I keep going back to my original idea of opening up the kitchen to the dining and living room… and decide to do a second design to see what this could look like. With the wall gone, it opens up our design options significantly. After many iterations, we land on the same white shaker style cabinets and camouflaged chimney. But in this design we are able to put in a 4.5’X7’ island that can sit 5 people, and flows into the dining room. Creating a completely open space between the kitchen, dining, living room and outside deck. We have also changed out some of the appliances to better fit the space. The fridge remains against the entry/kitchen wall, and the sink and dishwasher remain on the back wall. The main difference in this design is that the there is a counter mounted cooktop in the island and wall mount oven and microwave in the island across from the sink. There is also a ceiling mounted hood fan above the cook top. The island extends into the dining room and has cabinets on both sides of it, allowing for functionality and plenty of storage. This design definitely transforms the space, is more current, improves flow and is better for entertaining.


Open Kitchen Plan
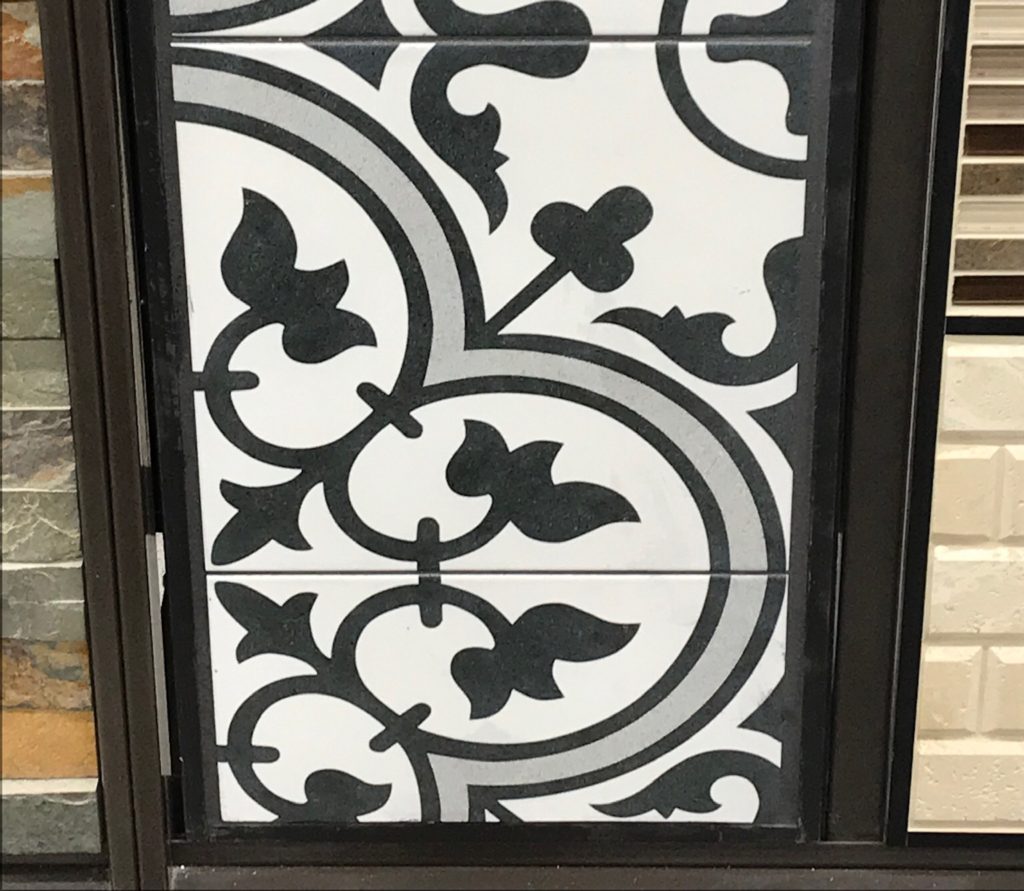
Since we are going with the white cabinets, we will add grey accents through the walls, floors and backsplash. I have selected a black, white and grey patterned tile for the backsplash to add some detail and a little punch to the room. My husband is on board with everything except the tile. He cannot visualize it and thinks it is too busy. I love it and think it will just add to the space. What do you think? Adds to the design or am I the one who is visualizing it all wrong. Ah… its a backsplash, it can be easily changed if in fact my eyes are deceiving me. It’s hard to dispute that this design is much nicer and I love it. After seeing the two there really is just no comparison.
Even though we originally said we would save money by going with option one, once we look at option two, it is hard to dispute the value this would add from a lifestyle perspective and for home value as well. The house is definitely nudging us in the direction of the open kitchen plan. Actually I think it is more of a kick. It’s a no brainer it says! As we ponder this, we kind of have to agree. So we ask our contractor doing our windows if they could quote opening up the kitchen wall and installing a support beam across the opening, with applicable permits of course. Although it is a bit of an extra expense, it is not as expensive as we thought it would be and decide that it is a good spend for our house. Remember kitchens and bathrooms is where to spend the money. Ummm…. the extras are staring to add up. We are still on budget right? It will be worth it in the long run, right? Probably not a great sign if I am asking for reassurance. But I have to say that either way it will look beautiful! That really is what is important right? The house smiles… My Husband on the other hand… again is shaking his head. Stay tuned for the kitchen transformation and revival!
6 thoughts on “Kitchen Design – to open or not to open… that is the question”
I’m thinking a kidney and liver is needed as well! Nothing that a great bottle of wine or maybe two or three … Or maybe you will need the transplant yourself after this! YIKES
Love the kitchen plan and crazy for the tiles. Hang in there!
How many people are lining up to give blood for this major surgery? It seems bionic parts are needed.
Having seen it in the beginning, it will be an amazing transformation. The question is, will the two of you still be standing????
That is a very good question. It has been and I assume will continue to be a test of our spirit and endurance. But as I have said throughout, it is a learning experience and we will persevere. And, I truly believe we will come out smarter, wiser and victorious in the end!
I still can’t believe how large the living area now looks after taking down the wall. Looking forward to the end results. The house is feeling the love
Thanks for the updates! The open kitchen plan looks amazing. Have fun with the project.
Thanks Denise. I am really excited about transforming this kitchen and sharing the final product with everyone.
Comments are closed.